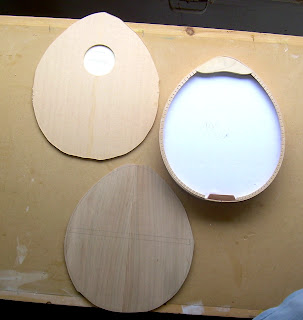
Here you can see the top and back, along with the cutoffs (which the plan suggests keeping for use as cauls later in the project). On the right are the three major components to date – the top, the sides and kerfing, and the back.
And here's an exciting photo – I stacked the parts together on the benchtop just for giggles and took a photo. At some point in the near future the instrument will be glued together like this and then the top and back will be trimmed to final shape. I just thought it would be cool to see it like this.

Since I still had several hours (at this point I had spent only about 1.5 of my 6 or so) I decided to cut out the soundhole as well. Now, the plans suggest cutting the soundhole patch using a hobby knife. I had been dreading this step because I was frankly worried that I would cut this poorly and damage the top by over cutting. It had to get done sometime, though – so here it goes.
The photo on the left shows the soundhole from the kit manufacturer with the soundhole patch glued over it. The photo on the right shows the results of the rough-in cut out (as suggested by the plans I made a first cut a bit shy of the edges of the soundhole, followed by a final cutout to actual shape). As you can see in the left photo below, I did some minor damage to the top wood surrounding the soundhole when cutting it out just as I had worried. However, the next step in the plan is to smooth and bevel the edges of the soundhole with sandpaper so I decided not to worry too much about minor damage. Fortunately the damage turned out to be very minor indeed – the photo on the right is the soundhole after smoothing and rounding with some 120 grit sandpaper (the MDF of my benchtop is also visible here, and it might make the soundhole hard to make out. Sorry.)
These last two photos are of the top after all the work of today was complete. The one on the left is of the inside of the top (the side that will not be visible after the instrument is complete). You can see the soundhole patch and the markings for all the braces in this photo. The one on the right is of the outside of the instrument.
Next time I will be sanding the kerfing to match the curvature of the top and back, and gluing in some of the braces. Not too long until the body is largely complete!


No comments:
Post a Comment