Tuesday, September 16, 2008

Fitting the top

So I finally got to work a bit on the mandolin this weekend again.
Today I glued the back brace onto the back, cut notches in the kerfing for the top braces to fit into, and trimmed the top braces so that they fit into the notches behind the sides.
First I glued the back brace on. Since I already wrote ad nauseum regarding gluing braces when I wrote about the top, I will refrain from kills virtual trees here repeating that information. I'll just show a picture of the back and back brace glued up. Next step for these pieces is carving the brace.
The next step is to fit the top to the sides. To do this you start out by cutting notches in the kerfing so that the top braces, which in some cases extend almost all the way to the sides, can fit. We start out by lightly clamping the top to the sides, making sure that the centerlines align, and also making sure that we are clamping to the top (as noted in a previous entry the hole for mounting the neck is offset towards the back so we have to make sure we clamp the top onto the correct side...). Then we make marks on the sides where the braces protrude, and then transfer those marks to the kerfing, which we are then going to notch out. Per the instructions I used my handy Xacto knife to cut the notches. Here are some photos of the process.


Finally you have to trim the braces so that they are short enough to fit. I used my trusty Marples pull saw and a chisel. Here are photos of that:


And here is the top, "snapped" into place with the braces in their notches.

Thursday, May 22, 2008

Carving braces, or something to whine about!

Well, I finally found something to complain about in the mandolin kit. I’ll say again that I really feel that the kit itself is fantastic – the materials are great and everything is well thought out. I couldn’t be happier with them.

Recently, though, I have begun the process of gluing on and shaping the braces for the instrument. The instructions are somewhat incomplete in this regard. As I noted elsewhere, the instructions don’t really have any kind of direction on when to shape the ends of the braces during the glue-up process. It turns out to be practically unambiguous because you have to shape the ends of the short braces on the top before notching and gluing on the trans braces on the top. If you look carefully at the photos for the surrounding steps you can even see it has been done in the photos (although the photos for the nothing and gluing of the trans braces show the short braces carved in one photo and not yet carved in another, so that you can’t even get useful information indirectly on this point). But the instructions don’t tell you to do it at this time, and crucially they don’t tell you how to do it, either. You get some instruction on this point in a later step (there are two places where you have to shape braces), including a photo (the photo I included with my last post), but this is a logic bust in an otherwise very well constructed set of instructions and drawings.

What I really found disappointing is that I can’t find any instructions anywhere in the plans on when, or again crucially, how, to carve the braces. To make this deficiency clear it will pay for us to look at a photo of the plans.


This is the plan cross section of the short braces. See how the braces are supposed to be carved in a sort of boat hull shape rather than left rectangular in section the way they are delivered? (For my purposes I will use the word shape when talking about shaping the ends of the braces and the word carve for carving the sectional shape into the braces.) The plans don’t tell you when to do this carving. Now, it might seem that it doesn’t much matter when you do it, as long as it gets done before you glue on the top. It might even seem not to matter if you do it, although clearly not carving the braces has the effect of leaving an inelegant feature of the instrument and more critically of negatively affecting the response of the instrument while playing. (I read this in Guitarmaking, the Bible on the subject. I don’t know this from experience, but as a structural engineer – at least by training – it is obvious that this would be the case. Leaving the braces uncarved would substantially increase the stiffness of the top, thereby reducing its response to the vibration of the strings. Usually considered a good thing in highway bridges, but it would be a bad thing in a mandolin.)

Back to topic, the problem is that there is definitely an optimum time to carve the braces into this shape. You can’t carve them before gluing them to the top because then you’d be trying to clamp a pointy surface and the clamp would have trouble gripping the brace, and the extra material makes the brace stiffer so that you get more uniform clamping pressure with the limited number of clamps that can be brought to the party. So carving them on a bench away from the top is out. You therefore have to glue them on and then carve them. But that’s where it gets hazy for me. What do professionals do about carving the braces?

Let me take a moment to explain that carving the braces is tough. You can see in my photo that this was the hardest part of the process for me so far, and in fact I didn’t do it all that well. I’m satisfied enough to glue the instrument together – after all, except for the readers of this blog nobody but me will ever see the braces once they are inside the instrument – but obviously a professional builder would probably resort to using the top as firewood rather than sell the instrument with these braces on it. I suspect that the professionals use little planes in this process to take very thin, regular shavings of material, for at least part of the time they are carving braces. I don’t have any way of knowing this, though, because the plans did not include a single word of instruction on how to carve the braces. In fact, other than the little section on the plans and the fact that some of the photos – but not nearly all of them – show the braces carved into the desired final shape, carving the braces is simply omitted from the instructions entirely. So I used a chisel to carve them – the same one I used to shape the ends – and it came out better on some of the braces than it did on others. I think the short top braces look OK, but the trans braces look much less so. If you were to look carefully at the top of my instrument you would also see several places where I gouged the top ever so slightly while carving the braces. Unfortunately the cardboard mask I was using to protect the top while shaping the braces was too thick to permit its use during the entire carving procedure. I sanded these areas smooth.


Again back to our topic – when and how to carve the braces. I addressed the difficulties in carving the braces above, and also the method I use as well as the method I suspect the pros use. But the timing thing is another problem. You see, I glued on all four top braces before carving any of them. I’m betting that a professional would have glued on the two short braces, shaped and carved them, and then glued on the two trans braces. That way you would minimize the interference of other braces when carving the one you are working on. Sadly this did not occur to me until I was essentially locked (glued, you might say) into doing it my way. Because of this a small plane of the type I hypothesized about might not have been much help to me – the other braces would have interfered with the sole of the plane and prevented long cuts to the ends of the braces. Maybe pros don’t use planes for this very reason. At any rate, I carved the two short braces after taking the long braces out of the clamps, and then shaped and carved the trans braces. I wish I had done a better job but I guess you have to do it a number of times before you’re going to be great at it. The job I did will suffice for my first instrument, and I’m sure I will do things a bit differently on the next one.

Here’s a photo after the carving and shaping step (the other short brace looks much like this, the trans braces don't look as good):


Memo to Stewart MacDonald: please add some clarification of the carving process, and please do it in the appropriate place in the process. And thanks for the otherwise great kit!

Saturday, May 17, 2008

Shaping the Braces

I did some work on the mandolin today. It's been a while because I need a few cam clamps for the really long braces on the back and top. Today I just decided to do something, whether or not it was the logical next step. As it turns out I was able to do something that was a logical step after all. I shaped the short top braces and glued on the short transverse top brace.

Now, it should be noted that the instructions do not show a step for shaping the short top braces between the steps for gluing on the short top braces and gluing on the transverse top braces. Although it's obvious that you need to do it once you really look at the transverse brace step, where you cut a notch into the trans brace for the short braces, hopefully this will be corrected in a future version of the instructions, because there's no instructions on how to shape the braces until much later in the instructions. A small oversight, perhaps, but still a glitch in an otherwise excellent set of instructions.

I didn't take any photos of the actual carving because I was too lazy to walk upstairs to get the camera. However, here is a photo of the finished carved braces and a closeup of one of the ends. Note the way I also used a razor saw to trim the ends parallel to the centerline of the not-yet-installed transverse braces.


While doing the carving I learned a lesson the hard way. The instructions don't suggest masking the top wood with anything while carving the braces, and I was apparently too stupid to come up with that idea myself. I accidentally gouged the top while making a cut. The damage is minor, and on the inside, but I decided right there to cut out a protective mask from some cardboard (actually the back of the Xacto knife blister pack, which is thin but very rugged cardboard).


By the way, it's critical that the chisel be used correctly while shaping the braces. Here is a photo taken from the instructions showing the correct way to use the chisel in this step. Since your goal is to curve the cut, you need to have the chisel inverted with respect to the way you might typically expect to use it to allow the levering action required to curve the cut. Use an excreamly (my favorite Spoonerism of all times, by the way. My brother E heard an annoying noise and exclaimed, "That is exscreamly annoising!") sharp chisel for this, both for your own safety and to make it possible to make an accurate cut.


So that the short braces and the transverse braces will interlock and act as a team, you cut a notch into the trans braces to allow the short braces to interlock with them. As suggested by the instructions I used a very sharp Xacto knife to do this by making border cuts to depth and then just prying out the waste. Here are a few photos of the results.


Finally I glued on the short trans brace. Although I also notched the long trans brace I did not glue it on because I don't have enough clamps to do both at once. Here are some (clickable) photos of the glueup.


Monday, April 21, 2008

Recent work

Well, I've had a bit of a hiatus while I took care of some personal business in the past few weeks, mostly related to a small but significant bit of elective surgery I had over the past weekend. For the record it was not plastic surgery of any kind...

At any rate, over the several weeks since my last post I have accomplished a bit but not had time to post about it. Actually, I also failed to take photos of most of these steps, but fortunately they aren't really visually gripping steps to miss.

What I did over the past few weeks was exactly what I said my next steps would be in the last post. I glued the short braces onto the top and sanded the kerfing to match the radius of curvature of the top. Fortunately the kit builder again thoughtfully configured the sanding stick setup so that the sanding stick, with the additional pad attached, resulted in a radius of the correct curvature. Basically you attach a strip of self-adhesive 80-grit sandpaper to the end of the sanding stick (7" in from the end, actually) and then, keeping the additional pad on the side of the instrument directly across from the area being sanded, you just sand the edges until you have properly contoured and leveled the kerfing. To aid in doing that you scribble with a pencil all over the kerfing. When the pencil lines vanish you have done your job. The key here is to keep moving around the circumference of the edge to ensure that you remove material somewhat evenly.

Here's a photo of the sanding stick setup. See the strip of sandpaper attached to the stick, and the additional pad? This photo was taken after some sanding of the top edge of the sides.


I also glued on the short braces for the top. I can't do any additional gluing of top braces, or really of the bottom brace either, until I get a set of more or less lutherie-dedicated cam clamps, so I'm somewhat stymied at this point. I failed to take a picture of the top with both braces glued-up, but rest assured that the process was identical for both braces and that the top pretty much looks just like this, but with two braces attached. Here is a photo of the brace being glued from the "inside".


And here is a photo of that same gluing operation from the outside, showing a piece cutoff from the top being used as a caul to protect the top. Note that cauls were not used on the braces since they have to be carved and will lose much of the material in the area that the clamp would have been bearing on anyway.


And, finally, here is a photo of the top with one of the two short braces attached.


I also spent some time tuning a bench plane which will be crucial to the shaping of the braces and neck and to the trimming of the top and back to the sides. I never really understood that almost all planes, and other woodworking cutting tools like chisels, require substantial preparation in the shop before they can be used, even if they are purchased brand new. While some of the very high-end planes might come with flat soles and very sharp irons, most do not. On a bench plane you can also spend a considerable amount of time ensuring that the bottom is a true 90 degrees from the side of the plane. Fortunately in my case the sole was very flat when the plane arrived, and the sides were close enough to 90 degrees from the sole to be acceptable for my purposes. I am somewhat surprised by this since because this is just a bench plane and not a high-end plane like a smoothing or jointing plane I bought a Stanley and not a really good plane. But a few minutes of (frankly) significant exertion really got this plane into usable shape. Mostly it was just flattening the sole by polishing it on 80-grit sandpaper adhered to a piece of polished granite I got through my previous employer that is truly flat and very, very stable. I then polished it with ever increasing grits until the sole was flat and mirrorlike. I have yet to sharpen the iron in exactly the same way before being completely pleased with the tool, but it still makes impressive shavings despite the relatively cheap nature of the tool. But this is a bench plane, after all - how accurate are we really expecting it to be?

At some point I will post some details about my sharpening system. Basically it is the Scary Sharp system (link, perhaps not to the originator of the system using that name, to the right), using a Veritas honing guide and several pieces of polished granite with various grits of sandpaper stuck to them. My good friend Joe Barker, who is building a sailboat in a room about 5% larger than the boat and blogs at http://barkerboat.blogspot.com/, uses the same system (I gave him several pieces of the granite, too) and he has more details at his site. Ignore all the Old Style comments over there. He has great taste in beer (and women) - he just wants to feel like a boat builder and you just can't get Narragansett beer in Cincinnati.

Sunday, March 2, 2008

Biggest day yet, part II

Blogger kept crashing on me near the end of the last post, so I elected to split them into two posts. If you haven't yet read about shaping the braces, read the next post before this one.

Here you can see the top and back, along with the cutoffs (which the plan suggests keeping for use as cauls later in the project). On the right are the three major components to date – the top, the sides and kerfing, and the back.


And here's an exciting photo – I stacked the parts together on the benchtop just for giggles and took a photo. At some point in the near future the instrument will be glued together like this and then the top and back will be trimmed to final shape. I just thought it would be cool to see it like this.


Since I still had several hours (at this point I had spent only about 1.5 of my 6 or so) I decided to cut out the soundhole as well. Now, the plans suggest cutting the soundhole patch using a hobby knife. I had been dreading this step because I was frankly worried that I would cut this poorly and damage the top by over cutting. It had to get done sometime, though – so here it goes.


The photo on the left shows the soundhole from the kit manufacturer with the soundhole patch glued over it. The photo on the right shows the results of the rough-in cut out (as suggested by the plans I made a first cut a bit shy of the edges of the soundhole, followed by a final cutout to actual shape). As you can see in the left photo below, I did some minor damage to the top wood surrounding the soundhole when cutting it out just as I had worried. However, the next step in the plan is to smooth and bevel the edges of the soundhole with sandpaper so I decided not to worry too much about minor damage. Fortunately the damage turned out to be very minor indeed – the photo on the right is the soundhole after smoothing and rounding with some 120 grit sandpaper (the MDF of my benchtop is also visible here, and it might make the soundhole hard to make out. Sorry.)


These last two photos are of the top after all the work of today was complete. The one on the left is of the inside of the top (the side that will not be visible after the instrument is complete). You can see the soundhole patch and the markings for all the braces in this photo. The one on the right is of the outside of the instrument.


Next time I will be sanding the kerfing to match the curvature of the top and back, and gluing in some of the braces. Not too long until the body is largely complete!


Biggest day yet

Wow! I got several hours to work in the shop today and the outcome was better than I could have imagined. My wife took the kids and went off the visit her parents, and she instructed me (this is why I know she's the right girl) to work on the mandolin. I got more accomplished today than any other day of work on it yet!

I started off by shaping the braces for the top and back. The kit includes a specially sized “sanding stick” made of ¼” plywood. They even included a little piece of the same plywood for use as a caul for clamping the stick to the benchtop. The kit designers thought this step out well, and planned for it well, too – the caul that was included for the outside of the sides at the neck block it just the right height at the edges to result in the proper radius of curvature when used to elevate the non-clamped part of the stick. The following pictures should give some idea of what the heck I'm talking about:


The photo on the left shows the stick clamped to the benchtop and propped up at the other end using the neck block caul. A clamp holds the neck block caul in place – I found that the two clamps at the bench kept the stick from rotating sufficiently. As directed by the instructions I also supported the stick at two other points along its length; one of the supports is the tail block caul and the other is a piece of scrap left over from the toolbox I built for my son for his birthday. The picture on the right shows the same setup from above just for clarity. You can see the self-adhesive sandpaper (80-grit as recommended) in the photos.
The instructions say to sand one of the braces and compare it to the drawings, adjusting the curve by moving the neck block caul in or out until the curvature is satisfactory. You then sand all of the braces using that same setup so that they are the same. I found that, by luck, my setup worked out very well the first time, so I went about sanding all of the braces to the curvature shown on the plans (which the instructions helpfully tell me is about an 8' radius).


The picture on the left is an action shot of me sanding one of the braces. I used a longitudinal motion to sand them – that is along the length of the stick and not side to side across it. This just seemed easier and the results were good, so I guess it's OK – at any rate it matched the grain direction so it made for clean sanding. The photo on the right shows the completed braces. Note that there are two #3 braces.

The next step is rough-cutting the back and top. I had not originally planned to do this today, but the shaping of the braces went so well and so quickly that I decided to have at it. The instructions say to cut the top and back with a bandsaw if you have one. Since I do I decided to give this a shot.

Up until today I had not had luck with my bandsaw, which I bought used (along with almost all of the rest of my stationary power tools) from a guy who was liquidating his shop. I examined the saw and realized that I had not been setting the damned thing up correctly. Not one of the cuts I had tried with it had been successful until today. Today I adjusted the tensioner more carefully and realized that I had not been properly adjusting the blade guide. After having done this the saw cut like a dream. Lesson learned – adjust your bandsaw carefully for each situation and it will cut much, much better.

I used the bandsaw to cut out the back and sides (the instructions tell you to leave about ¼” proud for later trimming to the actual shape of the instrument). Because I was not being very careful about accuracy since I was leaving the cut proud it went fast. I first had to mark the brace on the back and trace the outline (the left photo) and then cut it out on the bandsaw (the right photo).


Flush with my success I then cut out the top as well.


Saturday, February 23, 2008

Soundhole patch

Because of a little glitch in timing today I got to work on the mandolin again. I only did a little bit of work, but it's still nice to get out there!

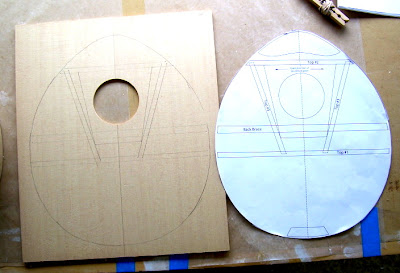
The task for today was to transfer the bracing pattern to the inside of the top and apply the soundhole patch (the soundhole patch is explained in a post below). In order to do that it was necessary to cut out one of the patterns of the top of the instrument. As an engineer I am loathe to work on an original document. I had therefore prepared for this by making photocopies of the pattern in question. Using the Xacto knife, I cut out the pattern for the top.

I then marked a centerline on the inside of the top. Using the centerline, and the soundhole already cut in the top by the kit manufacturer, I centered the cut out pattern on the top and traced around it to mark the approximate shape of the top. I then used the tip of my mechanical pencil (0.5mm!) to press through the pattern at the corners of all the braces, leaving dimples in the wood that I connected with the pencil and the straightedge to complete transferring the brace pattern (this is the method recommended by the instructions).

The final step was to glue the soundhole patch to the top. I did this using the Titebond. The instructions recommend using a weight instead of clamps for this operation - this made sense to me, so you can see the 30 cal ammo box I keep tools from my old Jeep in used as a weight. Because the bottom of the ammo box is not flat I used a cutoff of MDF, originally used as a spacer during glueup on another project (the markings on it have nothing to do with the mandolin) as a caul. A piece of waxed paper under the top, and one between the soundhole patch and the caul, prevent the top from sticking to the table and the caul.